PLANE TABLE SURVEYING
PRINCIPLE OF PLANE
TABLE SURVEYING
The principle of plane
tabling is parallelism, meaning that the rays drawn from stations to objects on the paper are
parallel to the lines from the stations to the objects on the ground. The
relative positions of the objects on the ground are represented by their
plotted positions on the paper and lie on the respective rays. The table is
always placed at each of the successive stations parallel to the position it
occupied at the starting station. Plane tabling is a graphical method of
surveying. Here, the fieldwork and plotting are done simultaneously and such
survey does not involve the use of a field book.
Plane table survey is
mainly suitable for filling interior details when traversing is done by
theodolite. Sometimes traversing by a plane table may also be done. But this survey is recommended
for work where great accuracy is not required. As the fitting and fixing
arrangement of this instrument is not perfect, most accurate work cannot be
expected.
ACCESSORIES OF A
PLANE TABLE
1. The Plane Table
The plane table is a drawing board of 750 mm × 600 mm
size made of well-seasoned wood like teak, pine, etc. The top surface of the
table is well levelled. The bottom surface consists of a threaded circular
plate for fixing the table on the
tripod stand by a wing nut.
The plane table is meant for fixing a drawing sheet over
it. The positions of the objects are located on this sheet by drawing rays and
plotting to any suitable scale (Fig 1).
2. The Alidade
There are two types of alidade — plain and telescopic.
(a)
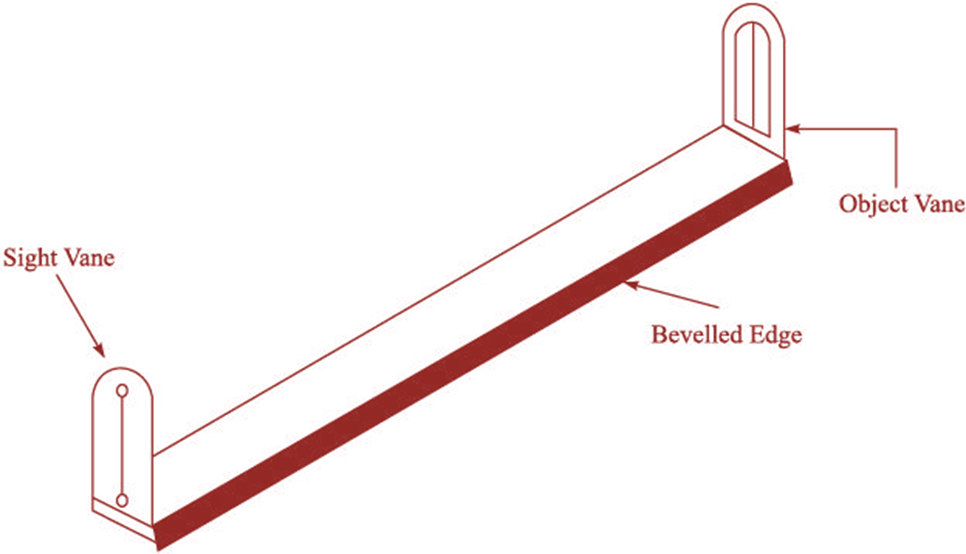
Plain Alidade The plain alidade consists of a metal or
wooden ruler of length about 50 cm. One of its edges is bevelled and is known as the fiducial edge. It consists of two vanes at
both ends which are hinged with the ruler. One is known as the object vane and
carries horsehair; the other is called the sight vane and is provided with a
narrow slit (fig 2).
Fig. 1 Plane Table
Fig. 2 Plane Alidade
(b)
Telescopic Alidade The telescopic alidade consists of a
telescope meant for inclined sight or sighting distant objects clearly. This
alidade has no vanes at the ends but is provided with a fiducial edge.
The function of the alidade is to sight objects. The
rays should be drawn along the fiducial edge (Fig 3).
Fig. 3 Telescopic Alidade
3. The Spirit Level
The spirit level is a small metal tube containing a
small bubble of spirit. The bubble is visible on the top along a graduated
glass tube.
The spirit level is meant for levelling the plane table
(fig 4).
Fig. 4 Spirit Level
4. The Compass
There are two kinds of compasses — (a) the trough compass, and (b) the circular box compass.
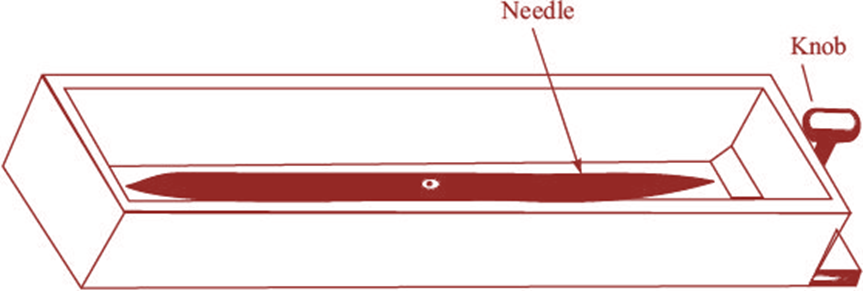
(a) The Trough Compass The trough compass is a
rectangular box made of non-magnetic metal containing a magnetic needle pivoted
at the centre. This compass consists of a ‘0’ mark at both ends to locate the
N-S direction (Fig. 5).
Fig. 5 Trough Compass
(b)
The Circular Box Compass It carries a pivoted magnetic needle
at the centre. The circular box is fitted on a square base plate (Fig. 6).
Fig. 6 Circular Box Compass
Sometimes two bubble tubes are fixed at right angles to
each other on the base plate. The compass is meant for marking the north
direction of the map.
5. U-fork or Plumbing Fork with Plumb Bob
The U-fork is a metal strip bent in the shape of a ‘U’
(hairpin) having equal arm lengths. The top arm is pointed and the bottom arm
carries a hook for suspending a plumb bob (Fig. 7).
Fig. 7 U-Fork
This is meant for centring the table over a station.
ORIENTATION OF PLANE TABLE SURVEYING
The method of setting up the plane table at each of the
successive stations
parallel to the position it occupied at the starting
station is known as orientation.
Orientation must be done when the plane table is set up
at more than one station. As already stated, plane tabling is based on the
principle of parallelism. So, the relative positions of the objects on the map
will be accurate only if the orientation is proper. But if orientation is not
done then the map will not represent the
actual positions of the objects.
Orientation may be done by magnetic needle and backlighting.
1. Orientation by Magnetic Needle
This method is suitable when the local attraction is not suspected in the area.
Procedure
Fig. 8 Orientation by Magnetic Needle
(a) Suppose A and B are two stations. The plane table is set up at station A and levelled by a spirit level. The centring is done by U-fork and plumb bob so that point a is just over the station A. Then the trough compass or circular box compass is placed on the right-hand top corner of the sheet in such a way that the needle coincides with ‘0–0’ mark. After this, a line representing the north line is drawn through the edge of the compass box. The table is then clamped.
(b) With the alidade touching point A, the ranging
rod at B is bisected and a ray is drawn.
The distance AB is measured and plotted to any suitable scale.
(c) The table is shifted and centred over B so that point b is just over B. The table is levelled. Now the trough compass is placed exactly along the north line drawn previously. The table is then turned clockwise or anticlockwise until the needle coincides exactly with the 0–0 mark of the compass. While turning the table, care should be taken not to disturb the centring. In case it is, it should be adjusted immediately.
(d) When the centring and levelling are perfect and the
needle is exactly at 0–0, the orientation is said to be perfect (Fig. 8).
2. Orientation by Backsighting
This method is accurate and is always preferred.
Procedure
(a) Suppose A and B are two stations. The plane table is
set up over A. The table is levelled by spirit level and centred by U-fork so
that point a is just over station A. The north line is marked on the
right-hand top corner of the sheet by through compass.
(b) With the alidade is touching a the ranging rod at B
is bisected and a ray is drawn. The
distance AB is measured and plotted to any suitable scale. So, point b
represents station B.
(c) The table is shifted and set up over B. It is
levelled and centred so that b is just
over B. Now the alidade is placed along with the line ba, and the ranging rod at A
is bisected by turning the table clockwise or anticlockwise. At this time the
centring may be disturbed and should be adjusted immediately if required. When
the centring, levelling and bisection of the ranging rod at A are perfect then
the orientation is said to be perfect (Fig. 9).
Fig. 9 Orientation by Backsighting
PROCEDURE
OF SETTING UP A PLANE TABLE OVER A STATION
The following steps have to be performed in order to set
up a plane table over a station:
1. Fixing the Table on the Tripod Stand
The tripod stand is placed over the required station
with its legs well apart. Then the table is fixed on it by a wing nut at the
bottom.
2. Levelling the Table
The table is levelled by placing the spirit level at
different corners and various positions on the table. The bubble is
brought to the centre of its run at every position of the table by adjusting
the legs.
3. Centring the Table
The drawing sheet is fixed on the table. A suitable
point P is selected on the sheet to represent station P on the ground. A
pin is then fixed on this selected point. The upper pointed end of the U-fork
is made in contact with the station pin
and the plumb bob which is suspended from the hook at the lower end is brought
just over the station P by turning the table clockwise or anticlockwise or
slightly adjusting the legs. This operation is called centring. The table is
then clamped. Care should be taken not to disturb the levelling.
4. Marking the North Line
The trough compass is placed on the right-hand top
corner with its north end approximately towards the north. Then the compass is
turned clockwise or anticlockwise so that the needle coincides exactly with the
0–0 mark. Now a line representing the north line is drawn through the edge of
the compass. It should be ensured that the table is not turned.
5. Orientation
When a plane table survey is to be conducted by connecting
several stations, the orientation must
be performed at every successive station.
It may be done by a magnetic needle or by the
backsighting method. The backsighting process is always preferred because it
is reliable. During orientation, it should always be remembered that the requirements of centring,
levelling, and orientation must be
satisfied simultaneously.
METHODS
OF PLANE TABLING
The following are the four methods of plane tabling:
1. Radiation,
2. Intersection,
3. Traversing, and
4. Resection.
1. Radiation
This method is suitable for locating the objects from a
single station. In this method, rays are drawn from the station to the objects,
and the distances from the station to
the objects are measured and plotted to any suitable scale along with the respective
rays.
Procedure
(a) Suppose P is a station on the ground from where the
objects A, B, C and D are visible.
(b) The plane table is set up over station P. A
drawing sheet is fixed on the table,
which is then levelled and centred. A point p is selected on the sheet to
represent station P.
(c) The north line is marked on the right-hand top
corner of the sheet with trough compass or circular box compass.
(d) With the alidade touching p, the ranging rods at A,
B, C and D are bisected and the rays are drawn.
(e) The distances PA, PB, PC, and PD are measured and
plotted to any suitable scale to obtain the points a, b, c, and d, representing
the objects A, B, C and D (Fig. 10), on
paper.
Fig. 10 Plain Tabling by Radiation
2. The Intersection Method
This method is suitable for locating inaccessible points
by the intersection of the rays drawn from two instrument stations.
Procedure
(a) Suppose A and B are two stations and P is an object
on the far bank of a river. Now it is required to fix the position of P on the
sheet by the intersection of rays, drawn from A and B.
(b) The table is set up at A. It is levelled and centred
so that a point a on the sheet is just over station A. The north line is
marked on the right-hand top corner. The
table is then clamped.
(c) With the alidade touching an object P and the
ranging rod at B are bisected, and rays are drawn through the fiducial edge of
the alidade.
(d) The distance
AB is measured and plotted to any suitable scale to obtain the point b.
(e) The table is shifted and centred over B and levelled
properly. Now the alidade is placed along with the line ba and orientation is done
by backsighting. At this time, it should be remembered that the centring,
levelling and orientation must be perfect simultaneously.
(f) With the alidade is touching b, the object P is
bisected and a ray is drawn. Suppose this ray intersects the previous ray at a
point p. This point p is the required plotted position of P (Fig. 11).
Fig. 11 Plain Tabling by Intersection
3. The Traversing Method
This method is suitable for connecting the traverse
stations. This is similar to compass traversing or theodolite traversing. But
here, fielding and plotting are done
simultaneously with the help of the radiation and intersection methods.
Procedure
(a) Suppose A, B, C and D are the traverse stations.
(b) The table is set up at station A. A suitable
point is selected on the sheet in such a way that the whole area may be
plotted in the sheet. The table is centred, levelled and clamped. The north
line is marked on the right-hand top corner of the sheet.
(c) With the alidade touching point a, the ranging
rod at B is bisected and a ray is drawn.
The distance AB is measured and plotted to any suitable scale.
(d) The table is shifted and centred over B. It is then
levelled, oriented by back-sighting and clamped.
(e) With the alidade touching the point b, the ranging
rod at C is bisected and a ray is drawn.
The distance BC is measured and plotted to the same scale.
(f) The table is shifted and set up at C and the same
procedure is repeated.
(g) In this manner, all stations of the traverse are
connected.
(h) At the end, the finishing point may not coincide
with the starting point and there may be some closing error. This error is
adjusted graphically by Bowditch’s rule
(i) After making the corrections for the closing error, the
table is again set up at
+ After centring, levelling and orientation, the
surrounding details are located by radiation.
(j) The table is then shifted and set up at all the
stations of the traverse and after proper adjustments, the details are located
by the radiation and intersection methods (Fig. 4.12).
Fig. 12 Plain Tabling by Traversing
4. The Resection Method
This method is suitable for establishing new stations at
a place in order to locate missing details.
Procedure
(a) Suppose it is required to establish a station at position P. Let us select two points A and B on the ground. The distance AB is
measured and plotted to any suitable scale. This line AB is known as the baseline.
(b) The table is set up at A. It is levelled, centred
and oriented by bisecting the ranging
rod at B. The table. is then clamped.
(c) With the alidade touching point a, the ranging rod
at P is bisected and a ray is drawn. Then a point P1 is marked on this ray by
estimating with the eye.
(d) The table is shifted and centred in such a way that
P1 is just over P. It is then oriented by backsighting the ranging rod at A.
(e) With the alidade touching the point b, the ranging rod at B is bisected and a ray is drawn. Suppose this ray intersects the previous ray at a point P. This point represents the position of station P on the sheet. Then the actual position of station P is marked on the ground by U-fork and plumb bob (Fig. 13).
Fig. 13 Plain Tabling by Resection
SPECIAL
METHODS OF RESECTION
Sometimes, after the completion of plane table
traversing, it may be noticed that an important object has not been located due
to oversight. If no station pegs are found on the field, some special methods
of resection are applied in order to establish a new station for plotting the
missing object. The methods are based on (1)
the two-point problem, and (2) the three-point problem.
1. The Two-point Problem
In this problem, two well-defined points whose positions
have already been plotted on the plan are selected. Then, by perfectly
bisecting these points, a new station is established at the required position.
Procedure
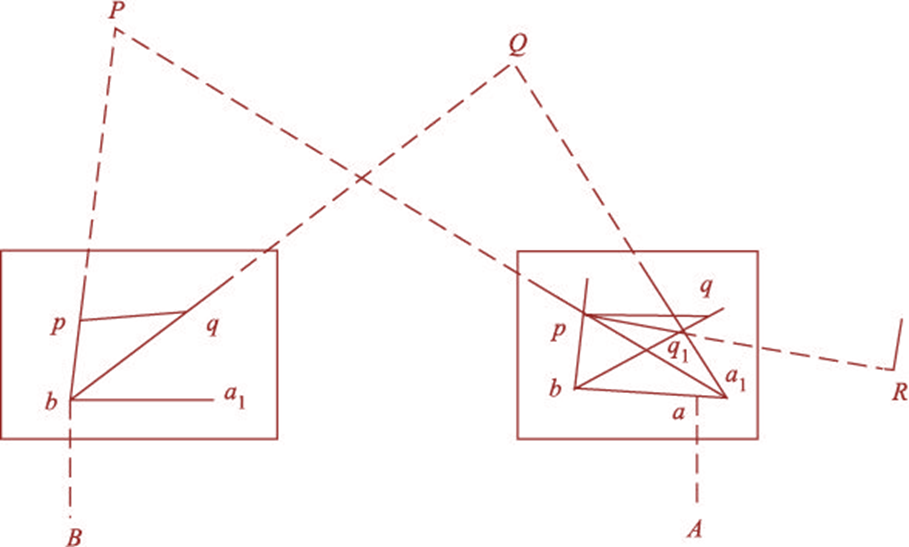
(a) Suppose P and Q are two well-defined points whose
positions are plotted on the map as p and q. It is required to locate a new station
at A by perfectly bisecting P and Q.
(b) An auxiliary station B is selected at a suitable
position. The table is set up at B, and levelled and oriented by eye
estimation. It is then clamped.
(c) With the alidade is touching p and q, the points P
and Q are bisected and rays are drawn. Suppose these rays intersect at b.
(d) With the alidade centred on b, the ranging rod-at A
is bisected and a ray is drawn. Then,
by eye estimation, a point a1 is marked on this ray.
(e) The table is shifted and centred on A, with a1 just
over A. It is levelled and oriented by backsighting. With the
alidade touching p, the point P is bisected and a ray is drawn. Suppose this
ray intersects the line ba, at point a1, as was assumed previously.
(f) With the alidade centred on a1, the point Q is
bisected and a ray is drawn. Suppose this ray intersects the ray bq at a point
q1. The triangle pqq1 is known as the triangle of error and is to be
eliminated.
(g) The alidade is placed along the line pq1 and a
ranging rod R is fixed at some distance from the table. Then, the alidade is
placed along the line PQ and the table is turned to bisect R. At this position,
the table is said to be perfectly oriented.
(h) Finally, with the alidade centred on p and q, the
points P and Q are bisected and rays are drawn. Suppose these rays intersect at
a point a. This would represent the exact position of the required station A (Fig. 14). Then the station A is marked on
the ground.
Fig. 14 Two-point Problem
2. The Three-point Problem
In this problem, three well-defined points are selected
whose positions have already been plotted on the map. Then, by perfectly
bisecting these three well-defined points, a new station is established at the
required position.
No auxiliary station is required in order to solve this
problem. The table is directly placed at the required position. The problem may
be solved by three methods: (a) the
graphical or Bessel’s method, (b) the mechanical method, and (c) the trial-and-error method.
(a) The Graphical Method
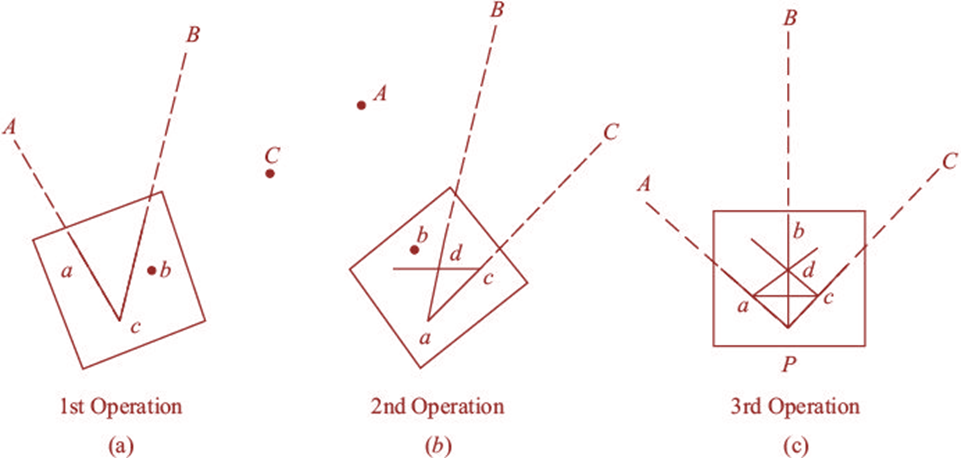
(i) Suppose A, Band C are three well-defined points
that have been plotted as a, b, and c. Now it is required to locate a station
at P.
(ii) The table is placed at the required station P and
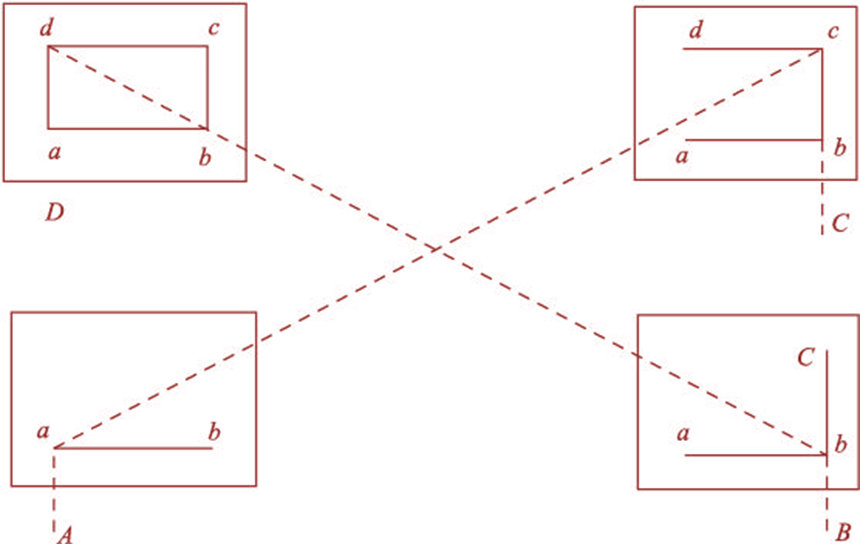
levelled. The alidade is placed along the line ca and point A is bisected.
The table is clamped. With the alidade
centred on C, point B is bisected and a ray is drawn [Fig. 15(a)].
(iii) Again the alidade is placed along with the line ac and
the point C is bisected and the table is clamped. With the alidade touching a, point B is bisected and a ray is drawn. Suppose this
ray intersects the previous ray at a
point d [Fig. 15(b)].
(iv) The alidade is placed along with db and point B is
bisected. At this position, the table is said to be perfectly oriented. Now the
rays Aa, Bb and Cc are drawn. These three rays must meet at a point p which is
the required point on the map. This point is transferred to the ground by a
U-fork and plumb bob [Fig. 15(c)].
Fig. 15 Solving Three-point Problem
Graphically
(b)
The Mechanical Method
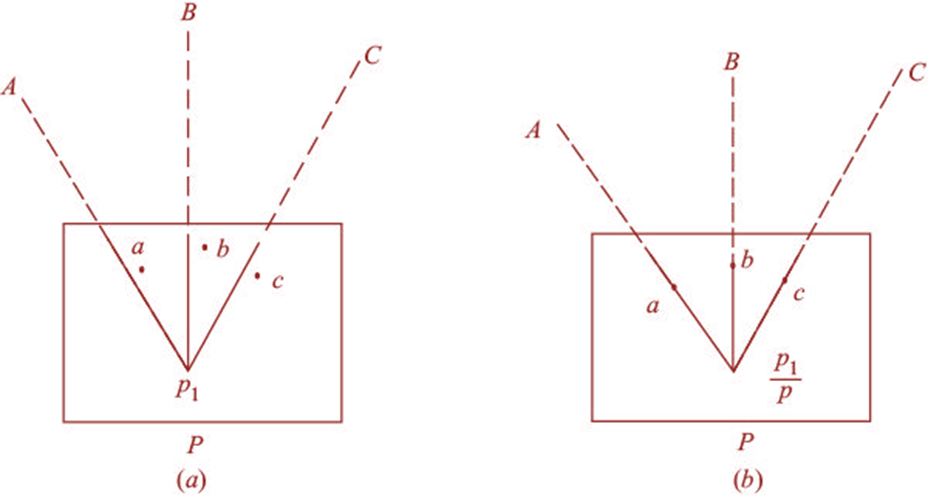
(i) Suppose A, B and C are three well-defined points
that have been plotted on the map as a, b, and c. It is required to locate a
station at P.
(ii) The table is placed at P and levelled. A tracing
paper is fixed on the map and a point p is marked on it.
(iii) With the alidade centred on P, the points A, B and
C are bisected and rays are drawn. These
rays may not pass through points a, b and c as the orientation is done approximately [Fig. 16(a)].
(iv) Now the tracing paper is unfastened and moved over
the map in such a way that the three rays simultaneously pass through the
plotted positions a, b, and c. Then the point p is pricked with a pin to give
an impression p on the map. p is the
required point on the map. The tracing paper is then removed [Fig. 16(b)].
(v) Then the alidade is centred on p and the rays are
drawn towards A, B and C. These rays must pass through the points a, b and c.
Fig. 16 Solving Three-point Problem
Mechanically
(c) The Method of Trial and Error
(a) Suppose A, B and C are three well-defined points
that have been plotted as a, b, and c on the map. Now it is
required to establish a station at P.
(b) The table is set up at P and levelled. Orientation
is done by eye estimation.
(c) With the alidade, rays Aa, Bb and Cc are drawn. As
the orientation is approximate, the rays may not intersect at a point but may
form a small triangle—the triangle of error.
(d) To get the actual point, this triangle of error is
to be eliminated. By repeatedly turning the table clockwise or anticlockwise,
the triangle is eliminated in such a way that the rays Aa, Bb, and Cc finally
meet at a point p. This is the required
point on the map. This point is transferred to the ground by U-fork and plumb bob (Fig. 17).
Fig. 17 Solving Three-point Problem by
Trial and Error
READ ALSO: Plane Table Surveying | Errors And Precautions | Procedure | Advantages And Disadvantages
FAQ
1. What
is the principle of plane tabling?
The principle of plane tabling is parallelism, meaning
that the plane table is always placed in every station parallel to the position
it occupied at the first station.
2. What
is orientation? Why is it done?
The method of keeping the table in successive stations
parallel to the position it occupied at the starting station is known as orientation. Orientation is done to
perfectly maintain, the relative positions of different objects on the map.
3. How
are centring and levelling done in plane tabling?
The centring is done by a U-fork and plumb bob. The
upper pointed end of the U-fork is kept in contact with the station pin when the plumb bob is just over the station
peg.
Levelling is done by a spirit level. The spirit level is
placed at the different corners and at various positions on the table. By
adjusting the legs of the table, the bubble is brought to the centre.
4. What
are the methods of plane tabling?
The methods of plane tabling are radiation,
intersection, traversing and resection.
5. When
would you apply resection?
To establish a new station with the help of two points
or stations.
6. What
is the intersection? When is it required?
The method of locating an object by the intersection of
rays drawn from two stations is called the intersection method.
This method is applied for locating inaccessible points,
which is when it is not possible to measure the distance from the station to
the object.
7. When
would you apply the two-point and three-point problem?
If it is found after completion of the plane table
survey that an important object has not been plotted then the two-point or
three-point problem is applied to locate a new station. These problems can be
applied even if all the station pegs have been removed.
8. What
do the terms ‘great triangle’ and ‘great circle’ mean?
In the three-point problem, the triangle formed by
joining three well-defined points is known as the great triangle and the circle
passing through them is called the great circle.
If you find
This information is helpful, please share it.
Thanks! For reading the article...









No comments:
Post a Comment