LEVELLING – FIELDWORK
The survey work is mainly divided into two:
(1) field work and
(2) office work.
In the field, necessary adjustments are done and the
results are recorded in a systematic manner as explained below.
Adjustments of a level
A level needs two types of adjustments, i.e.,
a. Temporary adjustments
b. Permanent adjustments
Temporary adjustments
The adjustments which are made for every setting of a
levelling instrument are called temporary adjustments. These include the
following:
i. Setting up the level
ii. Levelling up
iii. Elimination of parallax
SETTING UP THE LEVEL
This operation includes
fixing the instrument on the tripod and also levelling the instrument
approximately by leg adjustments. The setting may be accomplished according to the
following steps.
Step 1 The a tripod is unfolded and set up on the ground by inserting the metal pointed leg
bottoms into the ground so that it stands erect and firm to hold the level at a
height convenient to the observer looking through the telescope.
Step 2 The
box containing the level is opened and the position of the level as it suits in
the box is noted. If required the edges of the box are marked so that the level may be replaced in the box correctly.
Step 3 The
level is set on the stand by screwing it on or clamping it in the slot of the
tribrach.
Step 4 One
hand is placed lightly on the telescope and the other hand on one of the legs,
pressed against the thigh, to avoid jerks and snaps, while the leg is given
lateral to and fro motion to bring the bubble in the tube on the tribrach in
the centre of its run, or to bring the bubble to the centre of a circular level
on the tribrach, if such a level is provided on it.
Step 5 The
movement of the legs is now locked with the help of any suitable mechanism
provided with the tripod.
LEVELLING UP
The vertical axis of the instrument is rendered truly vertical through the levelling up operation which
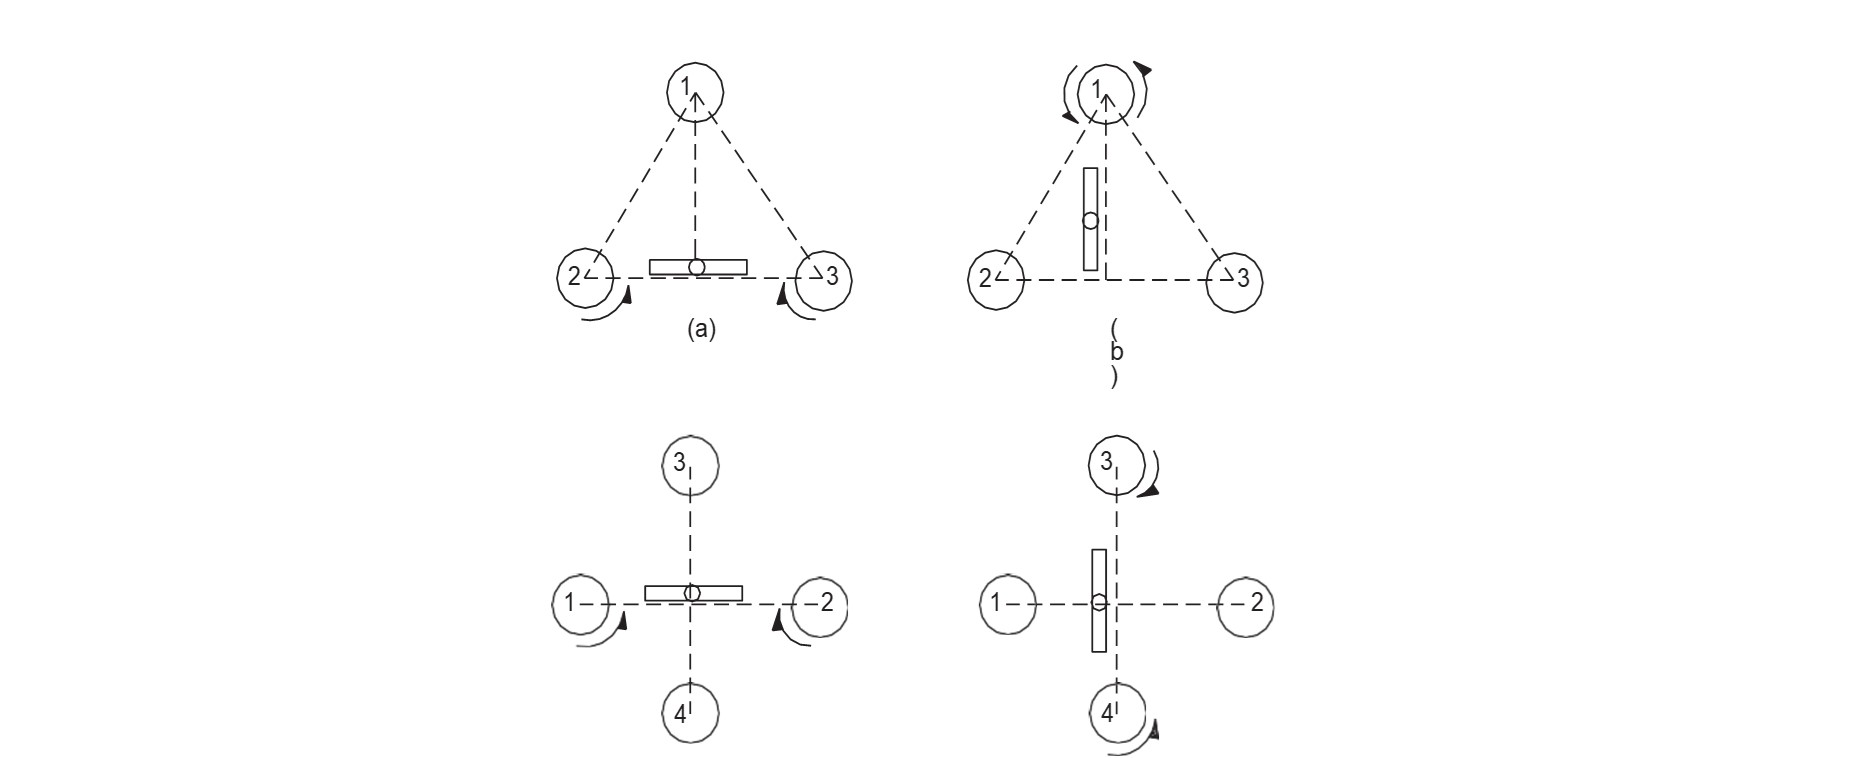
may be accomplished in accordance with the following steps. In Figure (a) and
(b) three-foot screw arrangements of a dumpy level and in figures (c) and (d)
four-foot screw arrangements of a dumpy level are shown.
Step 1 The
telescope axis is placed parallel to the line joining one pair of screws as in
Figure (a) and in Figure (c).
Step 2 Both the screws 1
and 2 are rotated simultaneously by moving them equally inwards or equally
outwards till the bubble of the spirit level on the telescope is brought to the
centre of its run.
Step 3 The telescope axis is
now placed perpendicular to its previous position, i.e., perpendicular to 1-2
line.
Step 4 The third screw 3 in
Figure below (in the case of a three-screw system) is rotated to bring the bubble of the spirit level on the telescope to the centre of its run.
In the case of four-screw
arrangements, the screws 3 and 4 are to be moved equally inward or equally
outward till the bubble of the telescope spirit level is brought to the centre
of its run (see below figured)
Step 1 through 4 have to be
repeated several times before the bubble tube of the spirit level on the telescope remains central for all positions of the telescope when the vertical axis
of the instrument becomes truly vertical. In reality, however, if the bubble
remains central over the angle of rotation, of the telescope, required for
reading the levelling staff, the purpose is served.
ELIMINATION OF PARALLAX
An apparent change in the
position of the object caused by the change in position of the observer’s eye
is known as parallax. In a telescope, parallax is caused when the image formed
by the objective is not situated in the plane of the crosshairs. Unless the
parallax is removed, accurate bisection and sighting of objects
become difficult. Elimination
of parallax is done by focusing the eyepiece for the distinct vision of crosshairs
and focusing the objective to bring the image of the object in the plane of the
crosshairs as explained below.
Focusing
the eyepiece: To focus the eyepiece for a distinct vision
of crosshairs, either hold a white paper in front of the objective or sight
the telescope towards the sky. Move the eyepiece in or out till the crosshairs
are seen sharp and distinct.
Focusing
the objective: After the crosshairs have been properly
focused, direct the telescope on a well- defined distinct object and intersect
it with a vertical wire. Focus the objective till a sharp image is seen. Moving
the eye slowly to one side may check the removal of the parallax. If the object
still appears intersected, there is no parallax. If on moving the eye
laterally, the image of the object appears to move in the same direction as the
eye and the observer’s eye and the image of the object are on the opposite
sides of the vertical wire, the image of the object and the eye are brought
nearer to eliminate the parallax. This parallax is called far-parallax. If, on
the other hand, the image appears to move in a reverse direction to the
movement of the eye and the observer’s eye and the image of the object are on
the same side of the vertical wire, then the parallax is called near-parallax.
It may be removed by increasing the distance between the image and the eye.
If you find
This information is helpful, please share it.
Thanks! For reading the article.


No comments:
Post a Comment